Prerequisites
❗If you don’t have an Azure account, you can create one for free here. ❗
Learning outcomes
After reading this article, you will be able to:
- Create an Azure Language resource
- Create a project in Azure Language Studio
- Learn how to create a custom Named Entity Recognition (NER) model using Azure Language Studio.
Introduction
Have you ever heard the phrase “Time is money”? As a business owner, you want to make sure your team is using their time wisely and not wasting it on repetitive and tedious tasks.
Take for example, the task of extracting customer data from loan agreements. This is a very common task in the business world, but it is very time-consuming and tedious, especially when you have to do it manually. This is where the power of artificial intelligence comes in. With the help of AI, you can automate this task and save a lot of time and money.
Here, I will focus more on the technical aspect of custom NER, but if you want to learn more, you can either read the official documentation from Microsoft, or watch my speech from the Global AI Student Conference where I talk with more details about the business aspect of custom NER.
In this article, I will show you how to use Azure’s Custom Named Entity Recognition (NER) to extract information from customer reviews and save a lot of time and money. Let’s dive into the details!
1. Create an Azure Language resource (& an Azure Storage account)
- Go to the Azure Portal and create a new Language service resource.
- Select Custom text classification & Custom named entity recognition and press “Continue to create your resource”.
- Fill in the Basics tab with your desired resource group, resource name, location and select the subscription and resource group you want to use.
- Select a pricing tier and press “Review + create”.

- Create a storage account for your Language resource if you don’t have one or select an existing one.
- Read the Responsible AI Notice and press “Review + create”.
- After the validation is done, press “Create” to create your resource.
2. Upload your data to the storage account
For this article, I created a sample dataset of loan agreements. You can download it from here. Otherwise, if you have your own dataset, you can use it as well.
In the compressed file, you will find:
- 15 loan agreements to train the model
- 3 loan agreements to test the model
- After the resource is created, head to the Storage account that you selected when creating the Language resource.
- Go the Containers tab and press + Container.
- Name it docs & create the container.
- After the container has been created, select it and press the Upload button to upload all the .txt files from the compressed file you downloaded earlier.
3. Create a custom Named Entity Recognition project
- Sign in to the Azure Language Studio using the same account you used to create the Language resource. (If you need to select an Azure resource, you need to select the one that you created earlier, like in the image below)

- Press the Create project button and select Custom named entity recognition.

- Select your storage account
- Give your project a name and select the primary language of your documents.
Important: The primary language of your documents should be the same as the language of the documents you are uploading. Otherwise, the model will not be able to extract the entities.
If you create the project using the 15 loan agreements I provided, you should select English (US) as the primary language.

- (Optional) Give your project a description and hit next
- Select the docs container you created earlier, select “No, I need to label my documents as part of the project” and press Next.

- Review the project details and press Create project.
4. Label your documents
Labelling your documents is a very important step in the process of creating a custom NER model. The more accurate your labels are, the better your model will be. This is because the model learns from the labels you provide.
Notice: If you are lucky enough to have access to an Azure OpenAI resource, you can use it to label your documents automatically. In most cases, you will have to label them manually.
Select the first document and start creating the entities. You can use the Add entity button to add a new entity type. Name it “agreement date” and press Done.


Keep doing this for all the entities:
- agreement date
- borrower name
- borrower address
- lender name
- lender address
- loan amount
- interest rate
- due date
- penalty
- guarantor
Now, you need to label the entities you created. The easiest option is to use the Text selection tool. Select the text you want to label and then select the entity you want to label it with. In the image below, you can see that I selected the text “2020-03-14” and labeled it with the “agreement date” entity.

Repeat this process for all the documents in the dataset, not only the training documents, but also the test documents. If you make any mistakes, just select the entity and press the Remove Label button.
After you are done, press the Save labels button.
For the files test1, test2 & test3, select the option to use the documents for testing.

5. Train your model
🥳 Now the fun part begins! It’s time to train your model.
- Navigate to the sidebar and select the Training jobs tab. Then, press the Start a training job button.
- Select a name for your model, use the manual data splitting option and press Train.
 This process is going to take some time, so you can take a break and come back later. You can check the progress from the notifications button on the top of the page.
6. Deploy & test your model
Navigate to the Deploying a model tab and press the Add deployment button.
Select a name for your deployment and press Deploy.

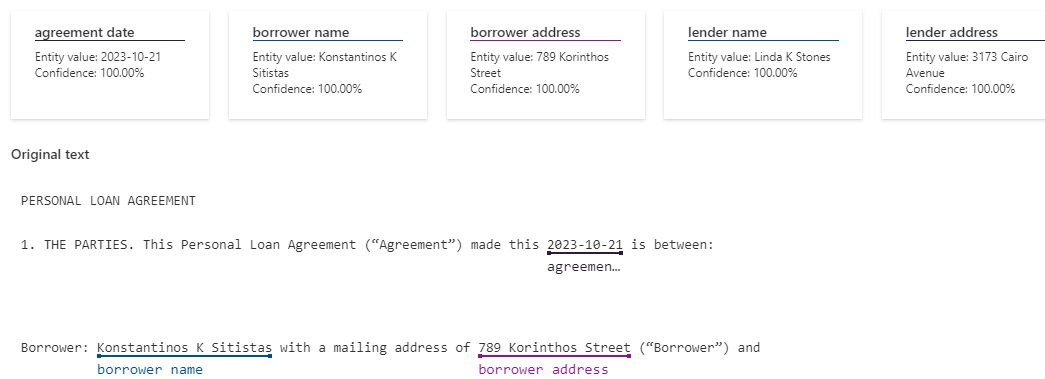
After the deployment is done, you can test your model by selecting the Testing deployments tab and entering some text in the Text to test field. Select the deployment you created before, and enter a loan agreement similar to the ones you used to train the model, or download the test4.txt and press Test.
In the Result tab, you can see the result of the magic!

The document has been labelled successfully! 🎉 Now, you can use the model to extract information from your documents. You can also use the model to label new documents and improve it even further, or you can use it to label documents in bulk, using the REST API.
Please, always keep in mind that you need to be responsible when using AI. You can read more about Responsible AI here. Always keep in mind the capabilities & limitations of AI, since there the success of the model is not guaranteed. However, the accuracy is going to improve as you keep training it, and it will definitely save you a lot of time! ⏱️
7. Conclusion
In this article, you learned how to create a custom NER model using Azure Language Studio. You also learned how to label your documents and train your model. Finally, you learned how to deploy your model and test it.
Hey, this tech can do so many cool things! I hope you get to try it out and see how it can make your life easier! 🤖